How Do I Update My SeekaHost Account Password?
How to Update My SeekaHost Account Password?
If you’re a SeekaHost user, you know that keeping your account secure is essential. In this user guide, we’ll walk you through the steps to ensure your password presence remains safe and sound.
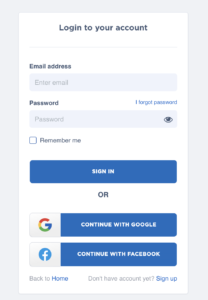
Step 1: Log in to Your SeekaHost Account
First things first, you’ll need to log into your SeekaHost account. Head over to the SeekaHost website and click on the “Login” button. Enter your current username and password.
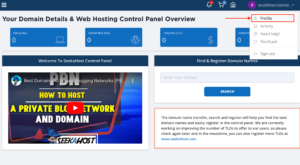
Step 2: Access Your Account Settings
Once you’re logged in, navigate to your account settings. This is usually located in the top-right corner of the page, represented by your username or profile picture. Click on it to reveal a dropdown menu, and select “Profile”.

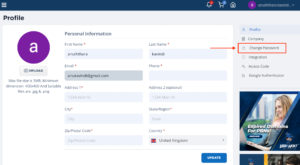
Step 3: Locate the “Change Password” Option
Under the “Profile” section, you’ll find an option to change your password. Click on the “Change Password” o button. This is where you’ll initiate the process of resetting your password.
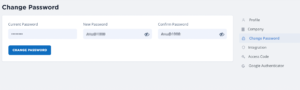
Step 4: Confirm your new password
To ensure security, SeekaHost asks you to verify your current password before entering a new password. Then you can enter your new password in the given box. After creating your new password, you’ll be asked to confirm it by typing it in again. Make sure both entries match to avoid any login issues later.
*It's important to create a unique password!
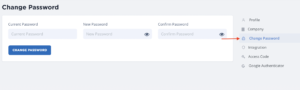
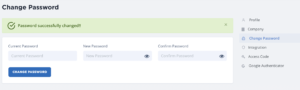
Step 5: Save Your Changes
Once you’ve successfully updated your password, don’t forget to save your changes. SeekaHost provides a “Change Password” button for this purpose. Your SeekaHost account password is now updated and more secure.
Remember, your curiosity knows no bounds, and neither does our support!
Reach out anytime – we’re here to answer your questions 24/7.
Happy exploring!